Kawasaki VN750 Forum banner

MOSFET R/R Installation Pictures & Notes

29K views 27 replies 14 participants last post by  thtanner  
#1 ·
After putting in my TPE stator, I wanted to make sure the charging system was as good as it could be. I was getting 14.9 @ idle, downwards to 14.3 @ 5k RPM with the stock style R/R. Not bad numbers, but I wanted a MOSFET.

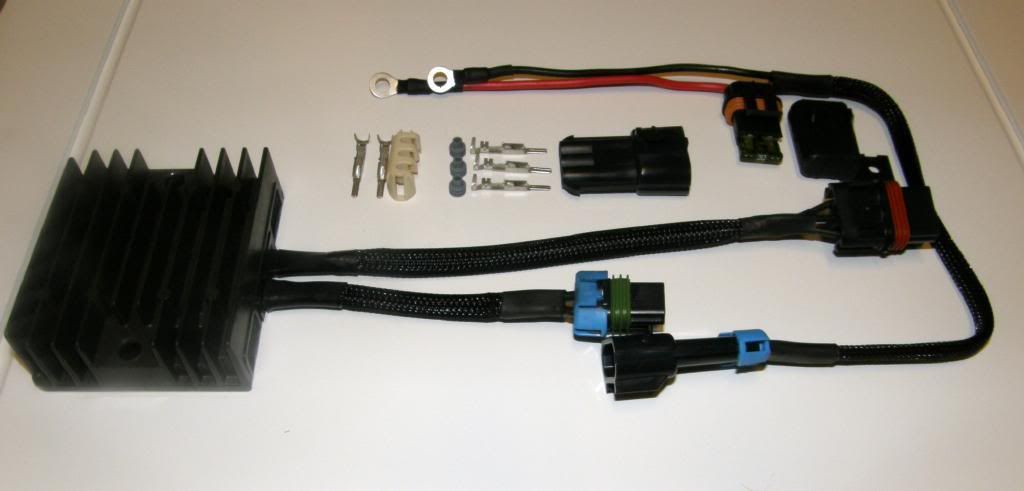
I grabbed a used one off a ZX-14 for $40 shipped off eBay, got the wiring needed, and waited. It all came in today, so I threw it on. Super easy installation, totally bypassed the stock wiring harness, and wired up the headlight relay. I had a friend solder everything up nice for me.

I am getting 14.6v @ idle, and 14.6v @ 4k. Stable numbers. :) It's ready for a cruise tomorrow.

Image

Work In-progress...

Image

Showing the R/R (FH010BA), stator wires, and headlight trigger relay wire.

Image

Soldering all done. Showing the headlight trigger relay and some lovely heat-shrink.
 
#3 · (Edited)
Thanks Slim.

Some notes to add to the fray for anyone following MOSFET stuff.

Model / Output / Source Bike
FH001 / 35A / FJR 1300
FH008EB / 40A / BR 600 RR
FH010BA / 50A / ZX-10R
FH012AA / 50A / FJR 1300, R1
FH012BA / 50A / ZX-14R, ZR1400, GTR1400
FH014AA / 50A / CBR 1000 RR
FH016AA / 40A / ZX-6R

Our regular R/R is under or at 30amp anyways, so any of the MOSFET based R/Rs look to be an upgrade. I see no reason to shoot for a FH012AA, as the FH010BA (the one I used), and many others, are also 50A. I'd cross reference the bikes years, but that's the basic list.
 
#5 · (Edited)
I am fairly certain the FH012AA was never billed as universal from the factory. It appears one or two individuals put together kits from this R/R, and sold them as universal. Nothing from Shindengen hints that it is a universal regulator.

The price that they were being sold for was actually fair, as the kit was 129, and the regulator is 139 from RonAyers/CheapCycleParts direct from Kawa. If you spend some time on eBay you can probably save some of that. My kit ended up costing around $86 installed.

Just leaving these notes for anyone who is seeking info on MOSFET regulators in the future.

Edit: I am reaching out to Shindengen's division that produces these regulators to see if I can get data sheets for each of them. A few people tried to reach out to Shindengen America with no luck (said the American side had no information on them), but I am going strait to the appropriate division. Japanese companies are usually very diligent with providing data sheets and technical specifications, so I am hopeful to receive a response.
 
#6 ·
you won't get any luck with Shindegen Japan either... they will only talk to MC Manufacturers. (I have emailed them several times) as for the FH012AA being a universal.. you are correct... its not it was for a Yamaha sports bike... but then again, there isn't such a thing as a universal R/R other than Electrosprt's universal which only works with an electromagnetic stator rotor, not he permanent magnet rotors we use.

the only thing I would have done differently in your install was use ES132 connector kit from electrosport to have a direct fit harness that wouldn't need any modifications to the existing harness with the help of the fallowing MOSFET R/R connectors
Stator Harness 3P250WP-QLW Female Connector Black $9.95
Battery Harness FH012 Complete Kit Part A $24.95
 
#7 ·
For my setup, I actually bypassed the existing wiring harness completely. It remains intact, but unused. The stock wiring is quite small, and with my bike, quite aged, so I felt it was best to bypass the stock wiring completely to eliminate as much resistance and loss as possible.

I have the R/R going directly to the battery, with a (sometimes mentioned as unneeded with AGM batteries) 30A self-resetting fuse on the positive lead.

The stator wires go direct from the new stator to the R/R.

The only thing that I had to modify from stock is spice the yellow wire from the junction box to one of the stator legs for the headlight relay. I chose to cut it and splice it in directly for cleanliness.

If you think your bike's wiring harness is up to snuff, then that would be slick, easy-to-use, and a clean looking alternative. I just wanted to take my stock wiring out of the equation entirely.

I just hate that the MOSFET connectors are so expensive, but the regular style are cheap as nails! I wonder if we could locate a cheaper, over-seas, vendor for these type of connectors? We'd probably have to buy 500 of them at a time, though. lol
 
#13 ·
That's the same kit I'm putting on, but from a different seller. This is the same one from Roadstercycle, he's a good person to work with if there's any problem, very helpful. Looks like the shipping has gone up, but I think you might get a better price at his website:
http://www.ebay.ca/itm/FH020AA-Shin...ng-sheathing-/271147003588?pt=Motorcycles_Parts_Accessories&hash=item3f219eeec4

Roadstercycle website:
http://roadstercycle.com/

I don't think it's overkill, you get plenty of battery wire, fuse for charge circuit, and just enough fittings. I had to round up some larger gauge stator wires.

The MOSFET is supposed to handle and bleed off the extra current better, without getting as hot.

The consensus I saw on stator fuses was that it wasn't really worth it. I'd still want a voltmeter to let me know I might have blown a fuse.

I found some small, cheap, digital ac voltmeters and thought about three of those to watch the stator voltage. Maybe hide them behind side cover or under the seat. I pretty much forgot about it though.
 
#17 ·
Can anyone verify which pin the yellow stator wire jumpers to at the Junction Box?

Looks like it belongs, as it's plugged into the JB, on the lower plug, back row, second hole from the bottom?

I disconnected this one over a month ago and I have two empty pins on the lower plug. Besides trying the headlight bypass and now forgetting which mode I left it in.

**************
******************
 
#19 ·
Just not sure which mode I left the bypass in. If the headlight works when I get it together, I'll do away with the yellow jumper so I get the voltage benefit. If not, I'll do the bypass again. Guess I coulda thought of that earlier huh.
 
#20 ·
just got mine from mntsnow along with a stator to go to todd to be rewired. holy crap i didnt realize how big the mosfet is
 
#26 ·
The ZX6R's FH016 may be a great option for the VN750.

Random internet image of FH016 kit


It has wire pigtails rather than the expensive Furukawa connectors, so you can cut off the weird Kawasaki plugs and put whatever connectors you want on it (this one has Metri-Pack connectors installed already).

Instead of just having the + and - wires (black/blue and black/white) in the second plug, it has a third wire (black) tied into one of the three stator wires. If you're completely bypassing the stator wires in the OEM harness, this provides an easy way to get the stator signal (yellow wire) to the junction box for the headlight turn-on.

Also, http://www.cycleterminal.com/ sells the Furukawa connectors and stock R/R connectors (along with a bunch of other electrical stuff). The prices are about the same, but the minimum order is lower than EB since he's not shipping from Japan.
 
#28 ·
11 year update; regulator works fine, but I'm replacing it with a SH775 series regulator. It only draws what it needs from the stator, which should help reduce stator temps and lengthen its lifespan. It's the same size as the older FH0xx regulators, and plug and play with their connector.

It's only rated for 30A max but well within spec for the VN. Not to be used for high revving (10k+) bikes) The later SH847 (50A) is rated for much higher RPMs.